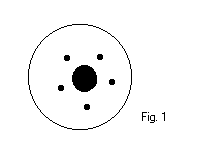

The spool (fig 1.) is the only piece of equipment you will have to make yourself. It requires a 1.5 inch (4 cm) length of 1 inch (2.5 cm) hardwood dowel. If you do not have a saw, some home improvement stores will cut the dowel for a fee. You will need a power drill with a 1/4 inch bit (5 or 6 mm) and some small 3/4 X 18 brads. (I have no idea how to convert this one.) Brads are little nails with no head. They're also called finishing nails. A vise and safety glasses are also necessary. "Remember to read and follow all safety precautions for your power tools. And most importantly, wear these, safety glasses." Norm Abrams . If you don't do this and end up blind in one eye or short a finger, don't tell me about it, I don't want to know. Anchor the dowel securely in the vise before beginning the cut. A crosscut blade is recommended. Hardwood dowels are, well, hard. So be patient and let the saw do the work. Don't worry too much about the exact length or a straight cut. Most of my spools look like a beaver gnawed them off. Sand the sharp edges off the dowel. If you have no sand paper, find a bit of unfinished concrete. Works OK, even comes in different grades. Adds to the hungry beaver effect, too. Scrubby pads and nail files are other possible substitutes for sandpaper.
Replace the dowel in the vise, cut end up. Drill a 1/4 inch (5 or 6 mm) hole in the approximate center of the dowel. Pay attention, once the drill (finally) gets through the dowel, it will hit the vise. Dulls the bit very effectively. You might want to have a replacement on hand. Mark 5 evenly spaced dots on the dowel around the hole. Five brads are a good way to start. The number of brads determine how tight the wire is crocheted. Six brads are best for just wire with no beads. Four make for a looser chain and are good for delicate work. If you have a tiny sized bit, go ahead and drill some starter holes where you've marked. Don't go down too far or the brads will just pop out. If there's some carpenters glue around put some glue in the starter hole using a toothpick. (Thanks for the suggestion Mlman!) Take the dowel out of the vise. Nail the brads into the dowel until 1/4 inch (8 mm) or so is left. You can hold on to the brads with a pair of pliers while you are starting them. Slight leaning of the brads is acceptable, but if they are too far off, your bracelet will be uneven. Mine usually look slightly tipsy. That's it for today's episode of Woodworking for the Maladroit .