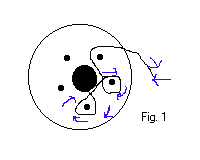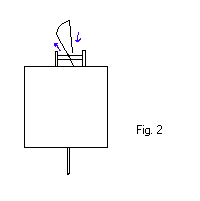


If you are using beads, string them on the wire before starting. Pass the end of the wire down the center hole from the top until about 8 inches of wire shows below the spool. Lay wire around the first brad using a clockwise motion. Fig.1. Then wrap the second through last brads going counter-clockwise around the spool. Be sure to use the same clockwise motion around all the brads. When you come back to the first brad, wrap it again and continue until all the brads have two loops of wire on them. Take the wire tail you created at the start and feed the end back up through the center hole. In between the next to the last set of brads, loop the wire over the top straight area and over the bottom straight area. Then push the end back through to the bottom of the spool. Fig. 2. This forms a tail which you will need to pull the bracelet through the center hole as you work.
Push the crochet hook through the bottom loop of the first pin. Then pull back on the hook to get the open area to the outside of the brad. Pull loop up and over the brad. Rotate the spool and continue around to the last brad. Wrap the brads again, remembering to loop the wire clockwise. Use your finger to put some slack wire in between each brad as you loop. If the wire is too tight, you'll snap it. If you snap the wire and you are too far along just to start over, back out until you have a centimeter or so of wire. Twist the ends of the wire together and put a drop of super glue on the splice. Allow to dry thoroughly. When you glue your fingers together (you will eventually!) you can use fingernail polish remover to get them apart. After the splice dries, use the round nose pliers to tuck the end up into the finished part of the bracelet. If you are putting 4-5 mm beads in this bracelet, wait until after you have done three layers and then push a bead into the area between the two brads along the wire. Put some extra slack in the wire between the brads in this layer. Add a bead after ever three layers, that is, on the fourth layer. If you are using seed beads, you can put a bead between each set of brads as you go. Experiment to get the effect you want.
Once the bracelet is long enough, cut the wire leaving another 8 inch tail. Pull the last loop off the first brad and pass the end of the wire through the loop. Continue with the second through last loops. Take the end of the wire and pass it through the bracelet. Try to pass it through loops in the second to the last layer in the bracelet. Then pull some more wire off the spool and pass it though the bracelet to create a second reinforcing tail. Put on your safety glasses. Trim the ends of both tails even. Put the ends of the wire in the pin vise, tighten the vise and twist the wire into a neat rope. Do the same on the other end. Using round nose pliers create a loop in the rope near the end of the bracelet. String the clasp onto the loop. Grab the loop with the pliers and then wrap the end of the bracelet with the remaining rope. When you get to the end tuck it back under the last loop. I use a crochet hook that I've snapped the head off to tuck the wire in. Super glue the end in so it doesn't come out and ruin someone's sweater. Do the same on the other end using the split ring. Be careful where you put the bracelet down, the glue tends to drip off and you don't want to ruin the furniture.